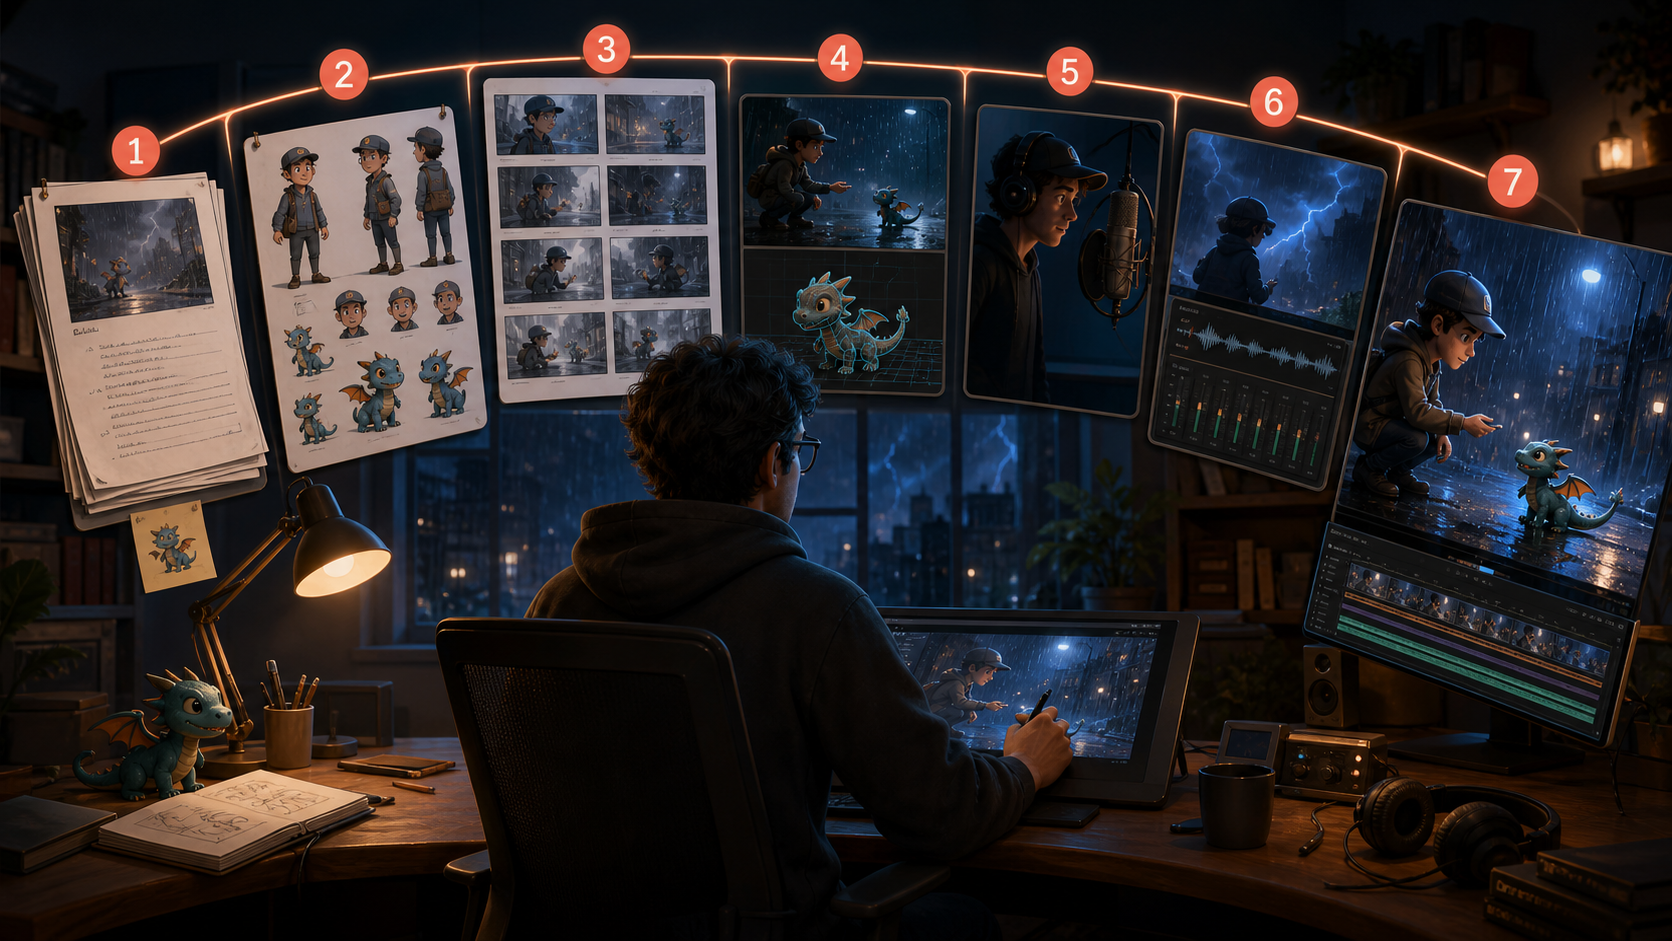
Can One Person Produce an Animated Short?
One person can now take a short animation from idea to export, but the difficult part is coordinating the whole production. A traditional team may include a writer, director, storyboard artist, character designer, animator, voice performer, sound designer, editor, and producer. The solo creator still has to make those decisions even when AI accelerates individual tasks.
AI does not remove directing, selection, continuity control, quality review, or editing judgment. The creator remains the final editor. A realistic first project therefore stays small: one location, one or two characters, one central event, limited dialogue, and a short runtime.
Why Fragmented Workflows Fail
When the script, character files, storyboard, clips, voice tracks, music, and edit live in disconnected systems, small transfer errors accumulate. Character descriptions drift, proportions change, filenames become ambiguous, storyboard timing no longer matches generated clips, and dialogue runs longer than the shot.
The solution is not necessarily one all-in-one product. It is a connected production method with approved assets, consistent names, and clear handoff rules. Every stage should receive the latest approved reference instead of reconstructing prior decisions from memory.
Stage 1: Script and Story Development
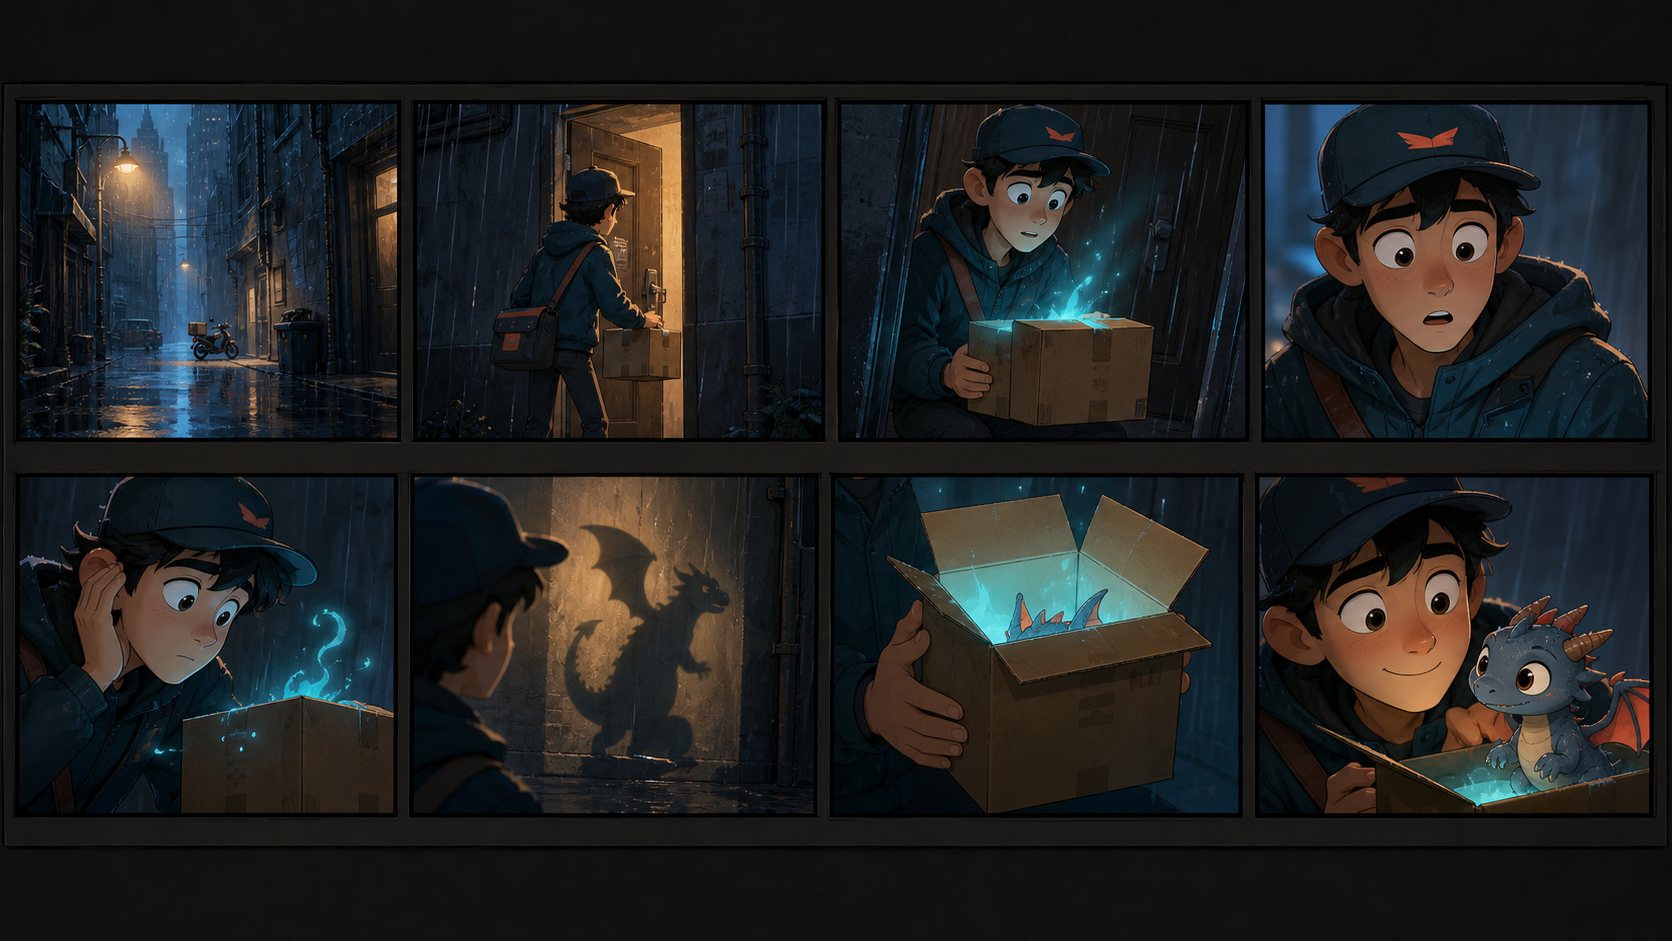
Define the protagonist, immediate goal, obstacle, visual turn, final payoff, runtime, and release platform. For a 45-second animated short, imagine a nervous courier crossing a rainy alley and discovering that a glowing package contains a tiny dragon. The project has one location, one lead, one creature, minimal dialogue, and a comic reveal.
Write the story in shots rather than paragraphs. Every beat should be filmable and have a clear duration. Remove subplots, extra locations, and crowd scenes from the first version. A shorter script with one readable event is more useful than an ambitious script that cannot maintain identity or timing.
Stage 2: Character Creation
Build both a visual identity and a performance identity.
The visual record includes face and eye shape, hairstyle, clothing layers, proportions, palette, accessories, and rendering style. The performance record covers personality, posture, common expressions, speech pattern, and movement style. Approve one character reference and one stable identity description, then reuse both across the production.
The dragon needs the same treatment: size relative to the package, horn shape, wing structure, palette, eye design, and behavior. A charming reveal only works if the shadow, package glimpse, and final creature appear to belong to the same design.
Stage 3: Storyboard Creation
For every shot, record:
- shot number and target duration;
- framing and camera direction;
- character position;
- one main action;
- dialogue or voiceover;
- camera movement;
- transition;
- approved reference asset.
The rainy-alley story can become eight shots: a wide alley, the courier entering, a close-up of the glowing package, a confused reaction, the package whispering, a dragon-shaped shadow, the box opening, and the tiny dragon reveal. Flag risky shots early. Hands opening a box, crowds, chases, and simultaneous dialogue create more production risk than a wide establishing shot or separate reaction.
Stage 4: Key Images and Video Generation
Treat an approved key image as a visual checkpoint for each shot:
- generate or approve the key image;
- compare character and location continuity;
- animate the approved image;
- make multiple variants for important shots;
- select the strongest usable interval;
- move to the next storyboard card.
This approach is more controllable than asking one text prompt to generate the entire film. Different shots can use different generation methods. Relevant still-to-motion steps can use VideoAny image to video, while the storyboards, reference sheets, compositing, and final editing can remain in the tools best suited to those jobs.
Stage 5: Voiceover and Dialogue
Write short lines that fit the actual shot duration. Keep one speaker in a close-up, separate reaction shots, use voiceover when visible mouth synchronization is unnecessary, and avoid multiple characters speaking simultaneously.
A two-person exchange is easier to produce as four units: character A speaks, character B reacts, character B speaks, and character A reacts. If a selected shot genuinely requires visible speech, VideoAny lip sync can be one step in the process; it still requires consent, appropriate voice rights, and a visual review.
Record temporary dialogue early. A storyboard that allocates two seconds to a five-second sentence needs to change before animation, not after every clip has been generated.
Stage 6: Music and Sound Design
Build sound around story functions:
- continuous ambience establishes the location;
- footsteps and clothing movement connect the character to the space;
- a distinctive object sound identifies the package;
- transition sounds support cuts;
- one musical theme carries the short;
- silence creates emphasis before a reveal.
For the courier story, use steady rain, a low magical hum when the package glows, a brief musical pause before the box opens, and one short comic sound when the dragon appears. Music can be developed through a relevant route such as VideoAny text to music, but sound effects, dialogue, ambience, and final mixing still need separate editorial decisions.
Stage 7: Editing and Final Review
Ask whether every shot advances the story, character appearance remains stable, screen direction is coherent, audio enters and exits naturally, pacing suits the release platform, and any shot can be shortened. A cutaway or sound bridge can hide a difficult transition, but it should not conceal a continuity failure.
Review the final film twice. The first pass is for story and rhythm; the second is for identity drift, motion defects, captions, audio balance, aspect ratio, disclosure, and export quality. The editor decides what survives. Generated material is not automatically finished material.
Organize the Project Into Four Sessions
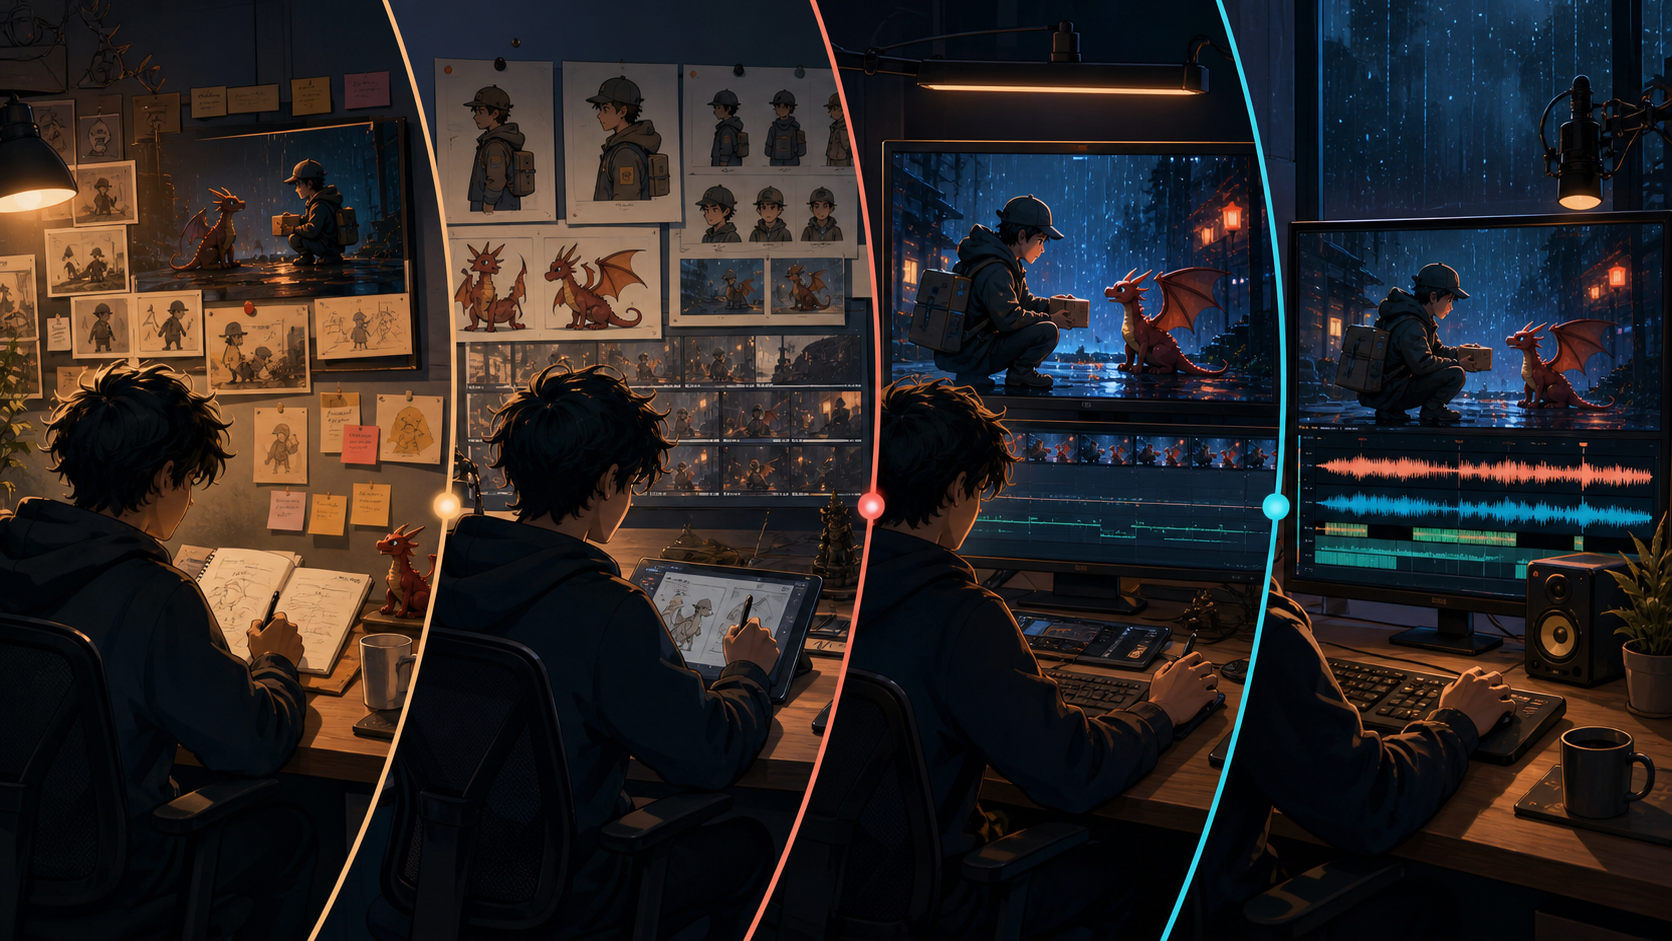
A practical solo schedule groups the seven stages into four sessions:
- Development: write the premise and outline, approve the script, and create character profiles.
- Preproduction: build references, storyboard the film, simplify risky shots, and prepare shot prompts.
- Production: approve key images, animate one shot at a time, create alternatives, and select usable clips.
- Postproduction: record dialogue, complete any required lip sync, add music and sound, edit, review, and export platform versions.
Store approved and experimental assets separately. Use names that include the shot, version, and status. Save the reference, prompt, aspect ratio, selected clip, and known defect together so a later revision starts from evidence rather than memory.
Who Benefits From This Workflow?
The method fits independent animators, webtoon and comic creators, Shorts or TikTok producers, musicians, teachers, small brands, game developers, and writers who want to previsualize a scene. The same scope rule applies to each: start with one character, one location, and six to eight shots before attempting a series.
Rights and Responsible Production
Use characters, voices, music, and reference art you own or are licensed to use. Obtain consent for identifiable people or cloned voices. Label synthetic concepts when viewers could mistake them for documentary material, and keep a provenance record for client deliverables.
A one-person animation studio does not mean one application replaces a traditional studio. It means one creator can manage a wider range of connected stages with disciplined assets, limited scope, and final human direction. The strongest first project is not the longest one; it is the short film whose story, character, sound, and edit all survive the full pipeline.