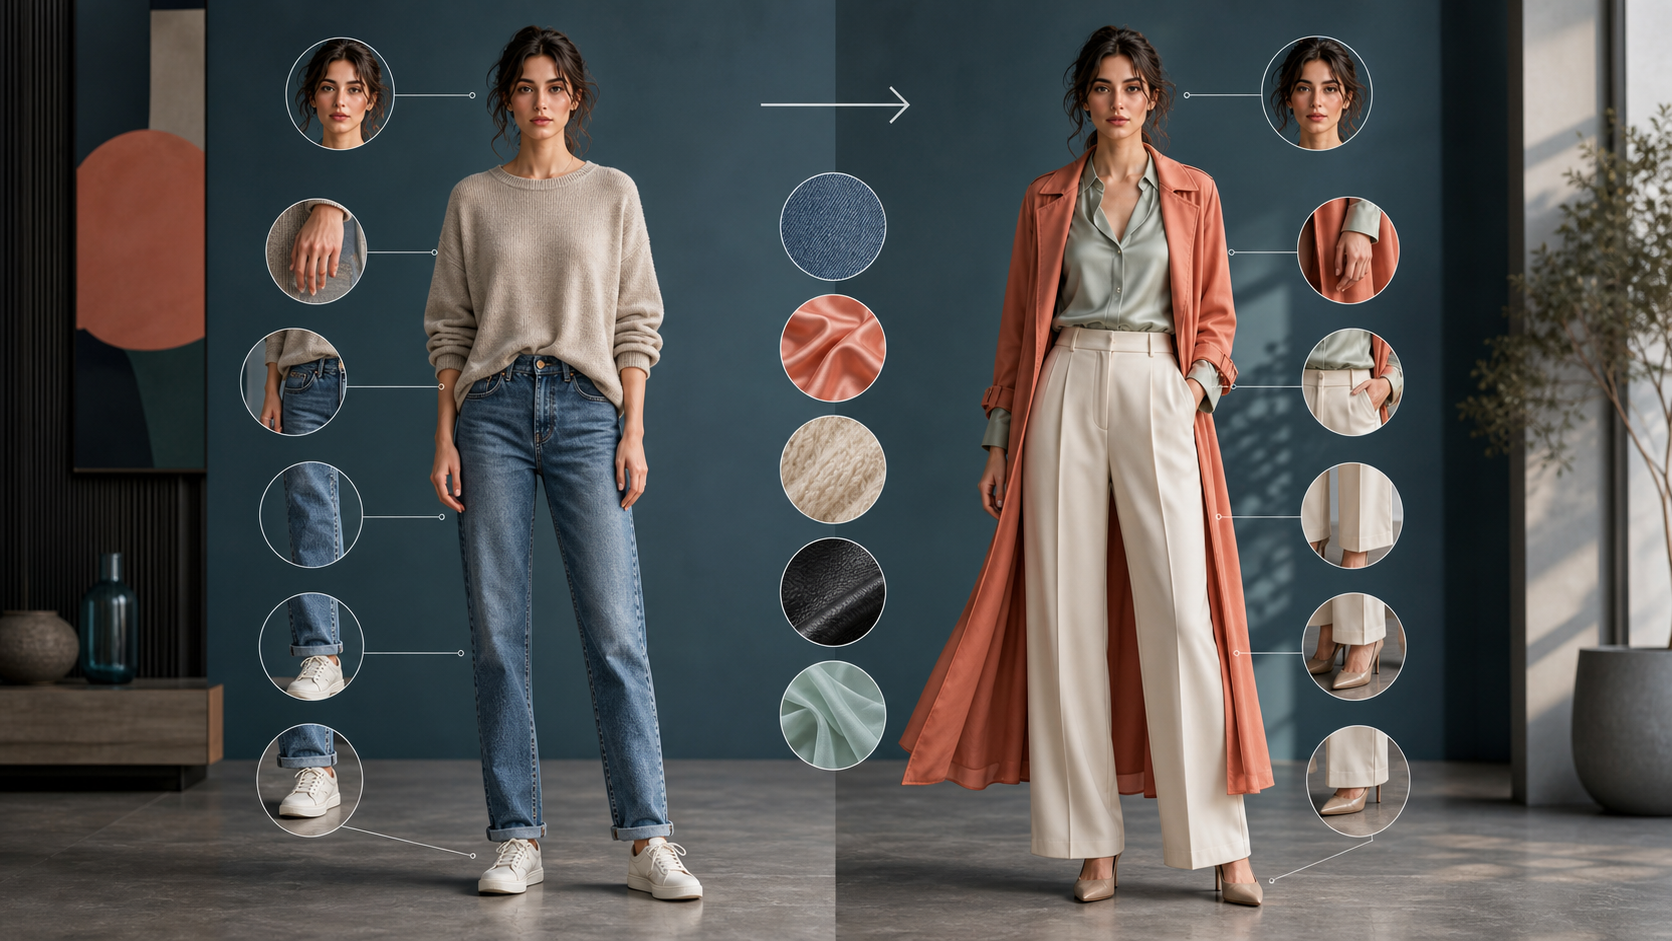
Full-body outfit changes are harder than portrait edits because every decision has more places to fail. The new clothes must follow the person’s stance, pass correctly in front of and behind the limbs, meet the shoes, cast believable shadows, and still preserve the face, body, camera, and background.
The solution is not an endlessly longer prompt. It is a controlled review process. Start with a source that exposes the information the model needs, define the complete wardrobe, lock everything that should remain unchanged, and inspect the result from face to floor. The ten tips below turn that process into a repeatable workflow.
Define the Acceptance Test First
Before generating, write down the delivery format and the conditions a result must pass. For a marketplace image, those conditions may include a clean silhouette, accurate product layers, and a neutral background. For a character concept, identity and pose continuity may matter most. For a social post, the image must remain legible after a vertical crop and phone-size reduction.
A practical acceptance test should cover four areas:
- Identity: face, hair, body proportions, and visible skin remain consistent.
- Structure: sleeves, waistlines, hems, footwear, and overlaps follow the pose.
- Scene continuity: camera angle, crop, lighting, background, and ground plane remain fixed.
- Delivery quality: no broken anatomy, floating fabric, false seams, noisy textures, or accidental accessories at either 100% or publishing size.
This test prevents you from choosing a visually exciting candidate that cannot survive production.
1. Use a Large, Clean Source Image
Begin with the largest legitimate version of the source you can obtain. The face, hands, waistband, knees, hems, and shoes should contain enough detail to evaluate after the edit. Compression artifacts and heavy blur can become false edges that the model interprets as garment details.
Do basic preparation first: correct orientation, choose the final crop, and fix major exposure problems. Do not upscale a tiny image and assume invented pixels are reliable evidence. If the face is only a handful of pixels tall, a wardrobe edit may appear acceptable from a distance while silently changing the person.
2. Choose a Pose With Clear Limbs
Full-body edits work best when the model can see where the torso and limbs begin and end. A relaxed standing pose with visible arms, hands, legs, and feet is easier to dress than crossed arms, tightly bent knees, or a body hidden behind furniture.
Occlusions are not forbidden, but they raise the review burden. If one hand sits in a pocket, the pocket opening and wrist must remain connected. If hair crosses a collar, the new collar must pass behind the same strands. When you can choose among source photos, prefer the pose with the clearest anatomy and fewest ambiguous intersections.
3. Match the Outfit to the Camera Angle and Stance
A garment description must agree with the geometry already in the photo. A three-quarter body needs three-quarter lapels, waistlines, and hems. A wide stance changes trouser tension. A seated pose compresses fabric at the hips and knees. Asking for a rigid front-facing catalog garment on an angled or moving body creates conflicting instructions.
Describe the fit relative to the pose: a jacket follows the turned torso, a skirt falls between the visible legs, or a long coat separates around a forward knee. Keep the original lens perspective and horizon rather than asking the wardrobe change to redesign the shot.
4. Specify the Outfit From Head to Toe
Do not describe only the most interesting item. List every visible component in top-to-bottom order: headwear, outer layer, base layer, waist treatment, lower garment, legwear, footwear, and allowed accessories. Explicit coverage stops the generator from filling gaps with unrelated pieces.
For example: “no headwear; cropped charcoal wool jacket over a tucked ivory silk blouse; narrow black leather belt; high-waisted straight trousers; dark socks; low-profile black loafers; preserve the existing watch and remove no other accessories.” This is more useful than “change to elegant business clothes” because it resolves the entire silhouette.
5. Define Fit and Layer Order
Garments are relationships, not a bag of keywords. State whether a shirt is tucked or untucked, whether a belt sits over a coat, whether a jacket is open or closed, and which layer passes behind the hair, arms, or accessories. Include length and volume: fitted at the shoulders, relaxed through the waist, hem at mid-calf, or trousers breaking once above the shoe.
Layer order is especially important at the neck, waist, wrists, and ankles. These contact zones reveal whether the new outfit belongs on the body. If the requested design has too many ambiguous layers, simplify the first pass until the silhouette and hierarchy are stable, then add one detail at a time.
6. Describe Fabric Weight, Not Just Color
Different materials respond differently to gravity and movement. Denim holds angular folds; silk forms softer highlights and follows the body; wool has volume and subdued reflection; leather resists fine wrinkling; chiffon can be translucent and reacts to air. Color alone cannot tell the model how a garment should hang.
Pair material with construction and condition: “heavy brushed wool with broad folds,” “light matte silk with gentle drape,” or “structured worn leather with restrained creasing.” Then confirm that the result behaves consistently from shoulder to hem instead of changing material halfway down the body.
7. Freeze Identity, Pose, Background, and Crop
Write a fixed-versus-change brief. In the fixed column, place the face, expression, hairstyle, anatomy, body proportions, pose, hand position, camera, crop, lighting, background, and visible personal accessories. In the change column, place only the wardrobe elements that may change.
This boundary matters more than a general instruction to “keep everything the same.” Compare each result directly with the original, not with the previous generated candidate. Generation chains accumulate small changes, so returning to the approved source helps prevent identity and composition drift. An image-to-image workflow is useful when you want every variation to begin from the same reference.
8. Inspect Every Intersection
Trace the outline of the body and outfit slowly. Check hair against collars, sleeves against wrists, hands against pockets, belts against jackets, hems between the legs, bags against hips, and shoes against trouser cuffs. Watch for fingers fused into fabric, doubled edges, fabric passing through a limb, or an accessory changing sides.
Evaluate the silhouette before surface details. A perfect textile pattern cannot repair a missing elbow or a coat panel that crosses the wrong leg. If only one small intersection fails, repair that region locally; if the anatomy or overall silhouette is wrong, return to the previous approved version.
9. Rebuild Ground Contact and Shadows
A longer coat, wider trousers, or different footwear changes the subject’s silhouette near the floor. Check that both shoes touch the same ground plane, legs carry believable weight, and cast shadows begin at the correct contact points. Floating heels and old shadows left behind by the previous outfit are common signs of an incomplete edit.
Lighting must also agree across the full body. Compare shadow direction on the face, clothing folds, and floor. When a new hem blocks light, the area beneath it should respond. Do not add a dramatic new lighting setup unless the background and subject are meant to change as well.
10. Change One Region at a Time and Revert on Drift
When the complete outfit is stable, make refinements in bounded regions: collar, sleeves, waist, lower garment, then footwear. Save an approved version at each checkpoint. If a later pass changes the face, hands, pose, or background, revert rather than trying to compensate through more generations.
Use the smallest edit that solves the observed defect. Local repair is appropriate for one cuff, seam, shoe edge, or shadow. A broken pose or inconsistent identity is a reason to return to the source and rebuild. This discipline preserves good work and makes the final decision traceable.
A Practical Review Sequence
Review candidates in the same order every time: face and hair, shoulders and neckline, hands and sleeves, waist and layers, knees and hems, shoes and ground contact, then background and crop. Inspect at 100% to find anatomy, edge, and texture problems; inspect again at delivery size to judge silhouette and immediate readability.
Generate three or four controlled candidates rather than dozens of unrelated ones. Record the source, prompt, aspect ratio, chosen version, and local repairs. A small, comparable batch makes it easier to identify which instruction improved the result.
Full-body wardrobe changes become dependable when the model is given clear geometry and the creator enforces clear boundaries. Start with strong evidence, describe construction from head to toe, and reject drift early. Explore VideoAny’s AI models when you are ready to test the workflow with an approved source image.
FAQs
What is the best source pose for a full-body clothes change?
A clear standing or lightly angled pose with visible limbs, hands, waist, hems, and shoes is the simplest starting point. Complex poses can work, but every occlusion adds an intersection that must be checked.
Why do the new clothes look pasted onto the person?
The usual causes are missing layer relationships, fabric behavior that does not match the material, incorrect perspective, or shadows that still describe the old silhouette. Fix structure and lighting before adding decorative details.
Should I regenerate the whole image when one shoe is wrong?
Use a local repair when the defect is confined to the shoe and ground contact. Regenerate from the approved source when identity, anatomy, pose, or the overall outfit silhouette has drifted.
What permissions do I need?
Use source images you own or have permission to edit, and obtain consent before changing the appearance of a recognizable person. Review publicity, copyright, and commercial-use requirements for the final context, and label conceptual images when viewers could mistake them for real products or events.